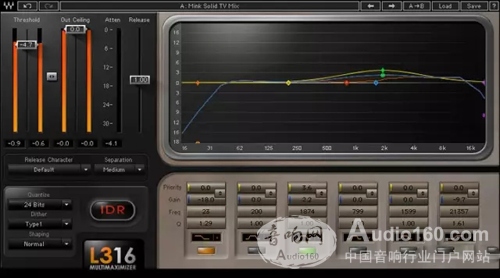
The limitation is the final treatment of the mastering stage and is considered to be the most important. The primary goal is to make your soundtrack as loud as possible without popping or distortion. Although many mixes can be improved with careful balancing and compressor use, there is no doubt that each song can benefit from the limiter as long as it is used properly. 1. Know your limits First, understanding the basics of the limiter is key. In essence, the limiter is a compressor with a very high compression ratio. Both the limiter and the compressor attenuate the transient high-intensity signal, but the amount of gain reduction of the limiter is determined by the user's Output Ceiling control setting. It sets the "limit" and the audio signal that exceeds a certain level cannot pass. Waves L2 Ultramaximizer 2. Know your bottom line If you've used compression on the stereo bus when you're mixing, you probably don't need to use compression at the mastering stage. Looking at the waveform, you will see if there are many peaks in the track; if not, you don't need to add any compression. But after all, the audio is still to be heard with the ear, not by the eyes. Therefore, you must not use it for compression. If you use it, you should not blindly. L3 Multimaximizer L3-16 Multimaximizer "You set the threshold to determine the overall gain boost," said mastering engineer Yoad Nevo. “L3 tries to give the minimum hearing impact to each band, providing the required gain variation. It automatically limits the most energetic part of the band. Generally it does not exceed 2dB, but you can also modify it to make it in adjacent bands. More restrictions - for example, to ensure that the bass and some of the guitar's mid-low frequency bands are more dynamic, you can limit the low frequencies. Using L3 correctly can add more impressive loudness to the track, while not fundamentally Will change the dynamics or balance."
The 7-inch tablet can be used as the golden size of a tablet computer. It is small and portable. It can be used at home and outdoors. You can browse the web, watch videos and play games. It is a household artifact. Although the size of the 7-inch tablet is inclined to the tablet, the function is more inclined to the mobile phone, so it can also be used as a substitute for the mobile phone. Compared with other sized tablets, the 7-inch tablet has obvious advantages in appearance and weight. Both the body size and the body weight have reached a very reasonable amount.
1.In appearance, the 7 inch tablet computer looks like a large-screen mobile phone, or more like a separate LCD screen.
2.In terms of hardware configuration, the 7 inch tablet computer has all the hardware devices of a traditional computer, and has its own unique operating system, compatible with a variety of applications, and has a complete set of computer functions.
3.The 7 inch tablet computer is a miniaturized computer. Compared with traditional desktop computers, tablet computers are mobile and flexible. Compared with Laptops, tablets are smaller and more portable
4.The 7 inch tablet is a digital notebook with digital ink function. In daily use, you can use the tablet computer like an ordinary notebook, take notes anytime and anywhere, and leave your own notes in electronic texts and documents.
7 Inches Tablet Pc,Quad Core Tablet 7 Inch,7 Inch Gaming Tablet,Supersonic Tablet 7 Inch Jingjiang Gisen Technology Co.,Ltd , https://www.jsgisengroup.com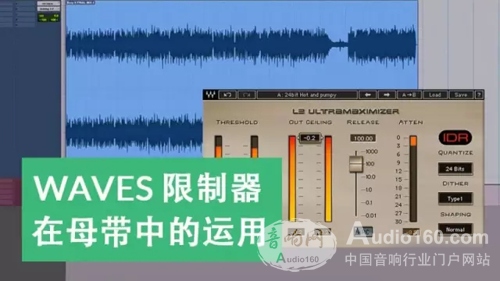
The most feared of mastering is the popping sound - the waveform of the signal exceeding 0dB will be cut, causing popping or noise when the playback device outputs. This is of course the problem we want to circumvent. You want your master to sound loud enough, or at least at the same volume level as other commercial products. The problem is that if you increase the overall level of the track, the audio peak will start to pop. The role of the limiter is to increase the volume and prevent peak bursts.
Modern mastering limiter plug-ins are extremely accurate when capturing peak signals and do not give any chance to sneak a signal that exceeds the upper limit setting. For this reason, limiters are sometimes referred to as "peak limiters" or "brick wall limiters." If you set it properly, you will not notice its existence. Waves' L2 Ultramaximizer and L3 Series Limiter plug-ins are specifically designed for mastering. They are widely acclaimed because they are very transparent in tone, allowing the soundtrack to sound without obvious limitations or compression.
Overall, the limiter is simpler to use than a compressor and relatively easy to set up. Usually it only takes three parameters: Threshold, Release, and Output Ceiling. (Occasionally there will be attack control or other parameters.)
The threshold determines when the limit begins to occur, and the output limit controls the magnitude of the limit. When the threshold is low, even a relatively low level signal experiences gain attenuation, while a high threshold produces a more measurable response. Not to mention the threshold, lowering the output limit always causes more gain attenuation. Release control determines how quickly the limiter can stop after limiting the signal below the threshold. If the release is long, you will hear a sense of pumping, and if it is too short, there may be distortion. Many limiters offer an automatic release option, and the computer determines the optimal release time for the track based on the waveform activity. Many times this is the best option. 
3. Set your limit as any mastering operation, and the limiter follows the principle of “less is moreâ€. Using the limiter too often can lead to disappointing results and can even ruin your audio track.
The reason is simple: the more restrictions you make, the more peaks—especially drums and percussion instruments—will be submerged in the mix. Admittedly, you can adjust the overall level, but what is worth the loss is that the sound and impact are gone. Keep in mind that limiters are more aggressive than compressors and are therefore more damaging to your mix.
The use of limiters should be "from light to light", the goal is to perfect the music, leaving a little gain, don't lose the energy and exciting elements of music. The output upper limit can be set from -0.2 or -0.1dBFS (note that the output limit is never set to 0 to prevent distortion on the terminal playback device). In addition, the threshold is very low, about -0.5. This will result in a gain reduction of 2-4dB, which is sufficient in most cases. If you have more, you will hear the sense of handling of the sound, and it is not worth adding extra gain. If the settings are correct, the limiter will only start working when necessary to ensure that there is no popping sound.
4. Multi-segment restrictions, or multiple restrictions Just as there are multi-stage compressors, there are also multi-segment limiters in modern mastering tools, such as Waves' L3 Multimaximizer and L3-16 Multimaximizer. They all provide a multi-band limit and perform uniform processing in the same limiter. In addition, they also have a central peak limiter that can detect the signals of all input bands, thus calculating the optimal possibilities for each band and completing the automatic attenuation. In this way, your mixing process is tailored to the music itself. 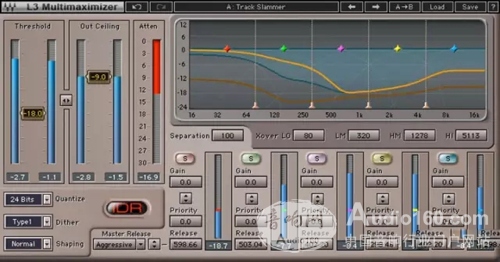
Some mastering engineers even use multiple limiters. Nevo sometimes uses L2 to slightly boost the level and then pass the signal through L3. “L2 is a broadband plug-in,†he said. “It limits the entire frequency range. However, L3 allows me to control different frequencies without affecting dynamics. With L2, drums, snares and vocals will Closer; in L3, I can better adjust the low and mid range, mainly for limiting the drum."
Occasionally, Nevo will even add a third limiter at the end of the signal chain - another L2, to get a second or two dB for the track.
5. Stay away from the loudness war. You should have heard about the "loud war". This seemingly endless pursuit of loudness and recklessness. Our advice on this is: stay away from the loudness battle.
In fact, louder sounds are not always better. That's right, the usual response to loudness enhancement is positive – everyone who wants to play a song wants to make a big noise. But after a long time, the continuous high volume will cause hearing fatigue, and even feel unbearable. When you use the limiter, you may feel that the soundtrack has been improved by significantly increasing the loudness, but you have to think about whether it will exhaust the life of the song. This also leads to the last point we want to talk about.
6. A devout reference to the comparison reference is another expression of “continuous comparisonâ€. With your master tape and the original mix of average loudness, you'll notice what you're missing after using the limiter to cut the peaks and make the sound louder. Then, if you are satisfied with your work and feel that the use of the restrictions outweighs the disadvantages, you can listen to your master tape in a variety of different playback systems to verify its universal adaptability. Finally, you can compare it to music that has been similarly published in business. If your mother brought out the soft music, there is no doubt about comparing it with the white metal, isn't it?
If you make several master tapes for the same CD or an episode, comparison is even more important. “All song tracks have to be back-to-back, especially with vocal performance,†Nevo suggested. “It is best to have all the song tracks in different speakers and play them back at different monitor levels. If you hear the difference between songs, you can adjust the power of the limiter plug. Level, let them balance as much as possible."